一、前言
六边形能力图如下,由 6 个 六边形组成,每一个顶点代表其在某一方面的能力。这篇文章我们就来看看如何基于 canvas 去绘制这么一个六边形能力图。当然,你也可以基于其他开源的 js 方案来实现,如 EChars.js 等。
二、六边形绘制基础
六边形能力图有 6 个 六边形组成,那我们只要绘制出一个,另外 5 个则依次减小六边形的边长即可。那我们首先来分析一下,如何绘制出一个六边形。
如上图,绘制一个六边形有以下几个关键点:
1.紫色矩形区域我们可以看成是 canvas 的画布。其大小可以认为是 (width,height)。center(centerX,centerY) 是其中心点,即 (width / 2, height / 2)。
2.绘制六边形的关键是计算出它的 6 个顶点的坐标。而如上图所示,这里面最关键的又是计算出六边形所在矩形区域的左上角坐标(left,top)。对照上图,(left,top) 的计算公式如下。
要计算出 (left,top) 需要先计算出 x,y 。而 x,y 的值与六边形的边长有关。
3.如上的 x,y 的计算公式为
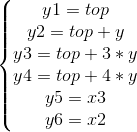
4.因此,X1(x1,y1),X2(x2,y2),X3(x3,y3),X4(x4,y4),X5(x5,y5),X6(x6,y6) 的坐标计算为
因此,得到绘制六边形的代码为:
function computeHexagonPoints(width, height, edge) {
    let centerX = width / 2;
    let centerY = height / 2;
    let x = edge * Math.sqrt(3) / 2;
    let left = centerX - x;
    let x1,x2,x3,x4,x5,x6;
    let y1,y2,y3,y4,y5,y6;
    x5 = x6 = left;
    x2 = x3 = left + x * 2;
    x1 = x4 = left + x;

    let y = edge / 2;
    let top = centerY - 2 * y;
    y1 = top;
    y2 = y6 = top + y;
    y3 = y5 = top + 3 * y;
    y4 = top + 4 * y;

    let points = new Array();
    points[0] = [x1, y1];
    points[1] = [x2, y2];
    points[2] = [x3, y3];
    points[3] = [x4, y4];
    points[4] = [x5, y5];
    points[5] = [x6, y6];
    return points;
  }
三、绘制六维能力图
3.1 绘制 6 个六边形
基于 canvas 绘制,首先就是需要获取 context。
_context = canvas.getContext('2d');
而绘制的话,已经知道 6 个顶点了,那只需要将这 6 个点用连线的方式连接起来就可以了。主要用到 moveTo(x,y) 和 lineTo(x,y) 两个方法。这里总共需要绘制 6 个六边形,那只要按等比例减小 edge 的值就可以了。因此绘制六边形能力图的主要代码如下。
function drawHexagonInner(edge) {
    _context.strokeStyle = _color;
    for (var i = 0; i < 6; i++) {
      _allPoints[i] = computeHexagonPoints(_width, _height, edge - i * edge / 5);
      _context.beginPath();
      _context.moveTo(_allPoints[i][5][0],_allPoints[i][5][1]);
      for (var j = 0; j < 6; j++) {
        _context.lineTo(_allPoints[i][j][0],_allPoints[i][j][1]);
      }
      _context.closePath();
      _context.stroke();
    }
  }
代码中还有 3 个相关的 API。beginPath() 和 closePath() 主要就是绘制得到一个封闭的路径。stroke() 主要是得到一个镂空的形状。当然,相应的就有 fill() 得到填充的形状。
3.2 绘制 3 条直线
绘制那 3 条直线也是比较简单的,只要将 X1和X4 连接,将X2 和 X5 相连,将 X3 和 X6 相连。代码如下:
function drawLines() {
    _context.beginPath();
    _context.strokeStyle = _color;
    for (let i = 0; i < 3; i++) {
      _context.moveTo(_allPoints[0][i][0],_allPoints[0][i][1]); //1-4
      _context.lineTo(_allPoints[0][i+3][0],_allPoints[0][i+3][1]); //1-4
      _context.stroke();
    }
    _context.closePath();
  }
3.3 绘制覆盖图
6 个顶点代表了六种能力,比如这里的各科成绩,把六种能力封闭成一个闭合路径并填充则称为覆盖图。要绘制出覆盖图,这里需要计算出六个顶点。6 个顶点可以通过最外围的六边形的 6 个顶点和中心点来计算。简单来说就是通过能力得分,在顶点到中心距离的占比来计算。计算公式如下。
代码如下
/**
   * 画覆盖物
   */
  function drawCover() {

    let tmpCoverPoints = _allPoints[0];
    _coverPoints = [];
    console.log("coverPoints ",tmpCoverPoints)

    let centerX = _width / 2;
    let centerY = _height / 2;
    for (let i = 0; i < tmpCoverPoints.length; i++) {
      _coverPoints.push([
        centerX + (tmpCoverPoints[i][0] - centerX) * (_data[i].score / 100.0),
        centerX + (tmpCoverPoints[i][1] - centerY) * (_data[i].score / 100.0)
      ]);
    }
    console.log("newCoverPoints ",_coverPoints)
    _context.beginPath();
    _context.fillStyle = 'rgba(90,200,250,0.4)';
    _context.moveTo(_coverPoints[5][0],_coverPoints[5][1]); //5
    for (var j = 0; j < 6; j++) {
      _context.lineTo(_coverPoints[j][0],_coverPoints[j][1]);
    }
    _context.stroke();
    _context.closePath();
    _context.fill();
  }
/**
   * 描点
   * @param pointRadius
   */

  function drawPoints(pointRadius) {
    _context.fillStyle = _color;
    for (let i = 0; i < _coverPoints.length; i++) {
      _context.beginPath();
      _context.arc(_coverPoints[i][0],_coverPoints[i][1],pointRadius,0,Math.PI*2);
      _context.closePath();
      _context.fill();
    }
  }
3.4 最后来绘制文本
绘制文本也是用的最外围的 6 个顶点的坐标。而用的 API 是 fillText(text,x,y),其中 x,y 代码文字绘制起点,但注意,不是文字所在矩形框的左上角,应该在左下角的大概位置。准确来说是文字的基线位置,这个在其他的GUI系统中也是一样,当然这里不追求那么细节了,就认为是左下角位置吧。
因此,对于不同侧的文字,其起点坐标也是不一样。如左侧的文字至少应该是左侧的顶点 x 减去文字的宽度。再比如,上下两侧的文字与顶点中相对居中对齐的,因此计算方法是 x 减去文字宽度的一半。代码的实现分为了上下左右来进行不同的绘制。
代码如下,看着有点长,但其实是很简单的。
/**
   * 绘制上侧的文字
   * @param text
   * @param pos
   */
  function drawUpText(item, pos) {
    let nameMeasure = _context.measureText(item.name);
    let scoreMeasure = _context.measureText(item.score);

    _context.fillStyle = '#8E8E8E';
    _context.fillText(item.name, pos[0] - nameMeasure.width / 2,pos[1] - 26);
    _context.fillStyle = '#212121';
    _context.fillText(item.score, pos[0] - scoreMeasure.width / 2,pos[1] - 10);

  }
/**
   * 绘制下侧的文字
   * @param text
   * @param pos
   */
  function drawDownText(item, pos) {

    let nameMeasure = _context.measureText(item.name);
    let scoreMeasure = _context.measureText(item.score);

    _context.fillStyle = '#8E8E8E';
    _context.fillText(item.name, pos[0] - nameMeasure.width / 2,pos[1] + 16);
    _context.fillStyle = '#212121';
    _context.fillText(item.score, pos[0] - scoreMeasure.width / 2,pos[1] + 32);
  }
/**
   * 绘制左侧的文字
   * @param text
   * @param pos
   */
  function drawLeftText(item, pos) {

    let nameMeasure = _context.measureText(item.name);
    let scoreMeasure = _context.measureText(item.score);

    _context.fillStyle = '#8E8E8E';
    _context.fillText(item.name, pos[0] - nameMeasure.width - 10,pos[1]);
    _context.fillStyle = '#212121';
    _context.fillText(item.score, pos[0] - 10 - (nameMeasure.width + scoreMeasure.width) / 2,pos[1] + 16);

  }
/**
   * 绘制右侧的文字
   * @param text
   * @param pos
   */
  function drawRightText(item, pos) {
    let nameMeasure = _context.measureText(item.name);
    let scoreMeasure = _context.measureText(item.score);

    _context.fillStyle = '#8E8E8E';
    _context.fillText(item.name, pos[0] - nameMeasure.width + 26,pos[1]);
    _context.fillStyle = '#212121';
    _context.fillText(item.score, pos[0] + 26 - (nameMeasure.width + scoreMeasure.width) / 2,pos[1] + 16);
  }
/**
   * 绘制所有文本
   */
  function drawText() {

    _context.fillStyle = '#8E8E8E';
    _context.strokeStyle = _color;

    let textPos = _allPoints[0];

    for (let i = 0; i < textPos.length; i++) {

      let item = _data[i];
      let pos = textPos[i];
      if(i == 0) {
        drawUpText(item, pos);
      } else if(i == 1 || i == 2) {
        drawRightText(item, pos);
      } else if(i == 3) {
        drawDownText(item, pos);
      } else if(i == 4 || i == 5) {
        drawLeftText(item, pos);
      }
    }
  }
四、总结
文章主要是基于 canvas 自定义一个六边形能力图,而这个能力的图的关键部分是对于六边形的绘制,而六边形的绘制又在于计算出 6 个顶点。有了 6 个顶点,再绘制其他的边,文本,覆盖区域等都基于这个 6 个顶点进行相应的绘制即可。
以上就是本文的全部内容,希望对大家的学习有所帮助,也希望大家多多支持。
Canvas,六边形能力图
免责声明:本站文章均来自网站采集或用户投稿,网站不提供任何软件下载或自行开发的软件! 如有用户或公司发现本站内容信息存在侵权行为,请邮件告知! 858582#qq.com
更新日志
- 小骆驼-《草原狼2(蓝光CD)》[原抓WAV+CUE]
- 群星《欢迎来到我身边 电影原声专辑》[320K/MP3][105.02MB]
- 群星《欢迎来到我身边 电影原声专辑》[FLAC/分轨][480.9MB]
- 雷婷《梦里蓝天HQⅡ》 2023头版限量编号低速原抓[WAV+CUE][463M]
- 群星《2024好听新歌42》AI调整音效【WAV分轨】
- 王思雨-《思念陪着鸿雁飞》WAV
- 王思雨《喜马拉雅HQ》头版限量编号[WAV+CUE]
- 李健《无时无刻》[WAV+CUE][590M]
- 陈奕迅《酝酿》[WAV分轨][502M]
- 卓依婷《化蝶》2CD[WAV+CUE][1.1G]
- 群星《吉他王(黑胶CD)》[WAV+CUE]
- 齐秦《穿乐(穿越)》[WAV+CUE]
- 发烧珍品《数位CD音响测试-动向效果(九)》【WAV+CUE】
- 邝美云《邝美云精装歌集》[DSF][1.6G]
- 吕方《爱一回伤一回》[WAV+CUE][454M]


